After the beam angle question, the second most common question we get about under canopy lighting is this one: "Okay, but how do I actually dim it?" Growers assume every LED fixture works the same way once it's wired in, and then get surprised to find out there are two genuinely different ways to control an under canopy grow light - one manual, one networked - and they're not interchangeable in how they're set up.
So let's break down how each one actually works, what hardware is involved, and which setup makes sense depending on the size and complexity of your operation.
Why Dimming Matters for Under Canopy Lighting
Under canopy lights don't get used the same way as top lights. A top light is often run at a fairly consistent output through most of the cycle. Under canopy lighting, by contrast, is usually adjusted as the canopy fills in - light levels that make sense once the canopy has closed in and needs deep-canopy penetration would be excessive during early vegetative growth, when there isn't much canopy mass to penetrate yet.
This is also where the industry as a whole has been moving. According to the 2025 State of the Cannabis Lighting Market research, dimming technology is now used by the vast majority of commercial indoor and greenhouse growers, with only about 16% reporting they don't use any dimming capability at all - down noticeably from the year before. Even more strikingly, 93% of commercial cultivators using supplemental lighting now run some form of lighting control, whether that's a building automation system, an environmental control platform, or wireless/wired dimming.
The Cost of Not Being Able to Dim
Running an under canopy fixture at full output during early vegetative growth, when there isn't enough leaf mass to actually use that light, is just wasted energy and unnecessary heat load in the lower canopy zone. On the flip side, under-driving the fixture once the canopy has filled in defeats the entire purpose of installing under canopy lighting in the first place - the lower bud sites end up light-starved again, which is exactly the problem this equipment is supposed to solve.
This is why dimming capability isn't a nice-to-have feature on an LED under canopy lighting fixture - it's part of what makes the fixture usable across a full grow cycle instead of only being correctly sized for one growth stage.
It also connects directly to a broader pattern researchers have documented in cannabis lighting: yield tends to increase steadily as light intensity rises, but that relationship isn't the same for every stage or every metric. Flower yield generally keeps climbing with higher PPFD and daily light integral, while cannabinoid and terpene content tend to plateau rather than keep increasing once intensity passes a certain point. In practical terms, that means running an under canopy fixture at maximum output all the time isn't just wasteful during early growth stages - it can mean paying for intensity in the flowering stage that isn't actually buying you more potency or terpene concentration, just more electricity cost. Dimming lets growers match output to what each stage can actually use, rather than defaulting to full power for the entire cycle.
Method 1 - Manual 0-10V Dimming
0-10V dimming is a long-established, low-voltage analog control standard used across horticultural lighting - a control wire carries a signal between 0 and 10 volts, and the fixture's output scales proportionally with that voltage. All of our under canopy light fixtures support 0-10V dimming as standard.
In practice, this means a group of fixtures wired together in series shares a single dimming module. That module has a manual dial or switch, and adjusting it changes the output for the entire connected group at once. It's a straightforward, physical control - no app, no network setup, no software to configure.
Pros and Cons of 0-10V Manual Dimming
The advantages are simplicity and cost. There's no controller software to learn, no network configuration, and the hardware cost is low relative to a networked system. For a single grow room, or for growers who don't need automated schedules, this is often all that's necessary.
The trade-off is that adjustments are manual. Someone has to physically go and turn the dial when it's time to change the light level, and if you're running several separate groups across different rooms or zones, each one needs to be adjusted individually. There's no way to program a gradual ramp-up, schedule automatic changes by week of the grow cycle, or adjust remotely.
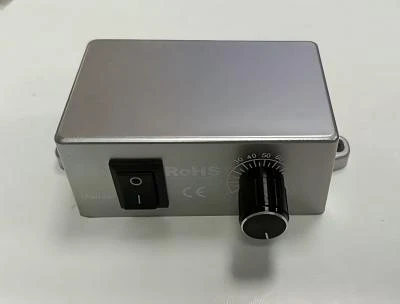
For a lot of smaller operations, this isn't really a downside in practice - a single flower room with one or two dimming groups doesn't need programmable zoning, and the person managing the room is already walking through it daily anyway. The manual dial becomes a limitation mainly once the number of independently-managed groups starts to grow, or once a facility wants lighting adjustments to happen automatically on a schedule rather than depending on someone remembering to make the change.
Method 2 - Smart Control via RJ12/RJ45 Daisy-Chain
For growers who want programmable, centralized control, our under canopy fixtures also come equipped with RJ12/RJ45 ports. Multiple fixtures across the grow room are daisy-chained together through these ports, and the whole chain connects to a compatible lighting controller - a widely used connection type in commercial horticultural lighting, not a proprietary format tied to one brand.
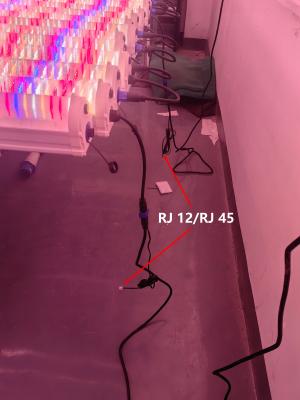
It's worth being clear on the underlying mechanic here: the RJ12/RJ45 connection isn't a separate dimming pathway on its own - it works together with the fixture's 0-10V dimming circuit. The controller sends the control signal to the fixture through the network cable, and the fixture's 0-10V dimming capability is what actually translates that signal into a change in output. In other words, a fixture needs 0-10V dimming built in before it can be brought under smart, networked control - the two methods aren't really "either/or" hardware options, they're a base capability (0-10V) plus an optional control layer on top of it (RJ12/RJ45 networking).
This connection method shows up often in real commercial installs - in the same 2025 industry research, 18% of growers using dimming technology reported using RJ45/RJ12 cabling specifically, alongside daisy-chainable T-cables and wireless protocols as the other common approaches.
What Smart Control Enables
Once fixtures are networked through RJ12/RJ45 and connected to a compatible controller, growers get capabilities that manual dimming simply can't offer:
- Programmable lighting curves, including gradual sunrise/sunset-style ramping instead of an abrupt on/off
- Independent control of different zones or rooms from a single controller, without needing to physically walk to each dimming module
- The ability to schedule intensity changes by week of the grow cycle, rather than remembering to adjust manually at each stage
- Integration potential with broader environmental control systems, so lighting changes can be coordinated with temperature, humidity, or CO2 adjustments
- Less staff time spent manually walking rooms to adjust dimming modules by hand
This kind of automated, zone-based control is exactly where commercial cultivation has been heading. Industry guidance on smart lighting controls for cannabis facilities points to dimming, daily light integral tracking, and time-of-use load shedding together delivering roughly an additional 10-15% in energy savings on top of baseline LED efficiency gains, and notes that large facilities benefit from grouping fixtures into zones so specific benches or sections can be dimmed independently without affecting the rest of the room - which is precisely what a daisy-chained, controller-based setup is built to do.
There are also some very practical, day-to-day reasons commercial teams end up preferring the networked route once they scale past one or two rooms. Staggered harvest schedules are common in larger facilities - one bench might be freshly transplanted while the bench next to it is three weeks into flower. With manual 0-10V dimming alone, each of those benches typically needs its own physically separate dimming module and its own wiring run, which adds cost and complexity as the number of independently-managed zones grows. A networked controller collapses that into one system: each daisy-chained group can be assigned its own dimming curve from a single control point, without running a dedicated dimming module to every bench.
Edge-of-canopy effects are another place this matters. Plants sitting at the outer edge of a row or bench typically receive less reflected light than plants in the middle, simply because there's less canopy around them to bounce light back. A networked setup makes it realistic to run perimeter fixtures at a slightly higher output than interior fixtures to compensate - a level of fine-tuning that's very impractical to maintain by hand across dozens of manual dimming modules, but straightforward to configure once through a controller.
0-10V vs RJ12/RJ45 Smart Control - Side-by-Side Comparison
| Feature | 0-10V Manual Dimming | RJ12/RJ45 Smart Control |
|---|---|---|
| Control method | Physical dimming module, manual dial/switch | Networked controller, daisy-chained fixtures |
| Additional hardware needed | Dimming module per group | Compatible lighting controller |
| Adjustment style | Manual, per group | Programmable, zone-based |
| Automation/scheduling | Not supported | Supported (ramping, scheduling, zoning) |
| Best suited for | Single rooms, smaller operations, limited budget | Multi-room commercial facilities, precision cultivation |
| Underlying requirement | Fixture must support 0-10V dimming | Fixture must support 0-10V dimming (RJ12/RJ45 builds on top of it) |
| Installation complexity | Low | Moderate (controller setup required) |
Which Dimming Method Should You Choose?
If you're running a single grow room, working with a limited budget, or simply don't need programmed lighting curves, 0-10V manual dimming with a dimming module covers what most small to mid-size operations actually need. It's reliable, low-cost, and doesn't require any additional system to learn or maintain.
If you're managing a multi-room commercial facility, need different zones dimmed independently, or want to automate lighting curves across a full grow cycle without manually adjusting dials room by room, the RJ12/RJ45 daisy-chain setup with a compatible controller is the better fit. And because every fixture ships with 0-10V dimming built in regardless of which control method you start with, there's no need to decide upfront and commit permanently - a facility can start with manual dimming modules and add a networked controller later without replacing the fixtures themselves.
Why Commercial Facilities Are Moving Toward Networked Lighting Control
Energy cost management continues to rank among the top challenges commercial cultivators report when it comes to lighting, and that pressure is a big part of what's driving the shift toward networked, automated control rather than fixed-output or purely manual setups. Broader industry guidance on automation in cultivation facilities has found that integrating control of lighting alongside HVAC and water management can reduce operating costs by roughly 15% compared to traditional manual approaches, with active energy management practices capable of generating savings up to 30% when applied systematically across a facility.
The U.S. Department of Energy's own guidance on dimmable LED lighting has noted that dimming, when applied appropriately relative to what the plant actually needs at a given stage, can reduce energy costs by a range of roughly 30 to 90 percent compared to running fixtures at full output continuously. That's a wide range because the actual savings depend heavily on how precisely a facility can match light output to real plant demand - which is exactly the gap that networked, zone-based control is built to close, compared to a fixed manual setting that stays the same until someone walks over and changes it.
There's also a regulatory and efficiency angle worth flagging. As more jurisdictions in North America and Europe introduce energy-efficiency reporting requirements or incentive programs for commercial cultivation facilities, being able to demonstrate metered, controllable lighting output - rather than fixed, always-on fixtures - is increasingly relevant for utility rebate eligibility and energy compliance documentation.
Dimming and Control Adoption: A Quick Data Snapshot
| Metric | Reported Figure |
|---|---|
| Commercial growers using some form of dimming (2025) | ~84% |
| Commercial growers using some form of lighting control system | 93% |
| Growers using RJ45/RJ12 cabling specifically for dimming | 18% |
| Potential energy savings from properly applied dimming | 30–90% |
| Additional savings from smart controls (dimming, DLI tracking, load shedding) | 10–15% |
| Savings from integrated lighting + HVAC + water automation | Up to 30% |
FAQ
Q: Can under canopy lights be dimmed?
A: Yes. Our under canopy fixtures support 0-10V dimming as a built-in standard, which can be operated manually through a dimming module or, when paired with RJ12/RJ45 daisy-chaining and a compatible controller, operated as part of an automated lighting schedule.
Q: What is 0-10V dimming and how does it work?
A: 0-10V dimming is a standard low-voltage control signal used across horticultural and commercial lighting. A control wire carries a voltage between 0 and 10 volts, and the fixture's light output scales proportionally to that signal.
Q: Can I control multiple under canopy lights from one controller?
A: Yes. Fixtures connect through their RJ12/RJ45 ports in a daisy-chain configuration, allowing a single compatible lighting controller to manage an entire row, zone, or grow room from one point.
Q: Do I need special wiring for RJ12/RJ45 daisy-chain control?
A: You need standard RJ12/RJ45 cabling to connect fixtures in sequence, plus a lighting controller compatible with 0-10V dimming output. No proprietary cabling is required - this is a widely supported connection type in commercial horticultural lighting.
Q: Can I mix manual and smart dimming in the same grow room?
A: Since every fixture includes 0-10V dimming as a base feature, a facility can run some groups on manual dimming modules and others on a networked RJ12/RJ45 controller, or start with manual control and add networked control later without swapping out the fixtures.
The real thing to understand about dimming on under canopy lighting is that it isn't a choice between two competing systems - it's a base capability with an optional layer on top. Every fixture supports 0-10V dimming out of the box, which alone is enough for straightforward, single-room manual control through a dimming module. For growers running larger, multi-zone commercial facilities, that same 0-10V foundation is what makes RJ12/RJ45 daisy-chaining and networked, programmable control possible - without needing different hardware to get there.
If you're planning a facility layout and aren't sure whether manual dimming modules or a networked controller setup makes more sense for your room count and automation goals, send over your facility layout and we can walk through which control approach fits.